
Table of Contents
What is Tardigrade ?
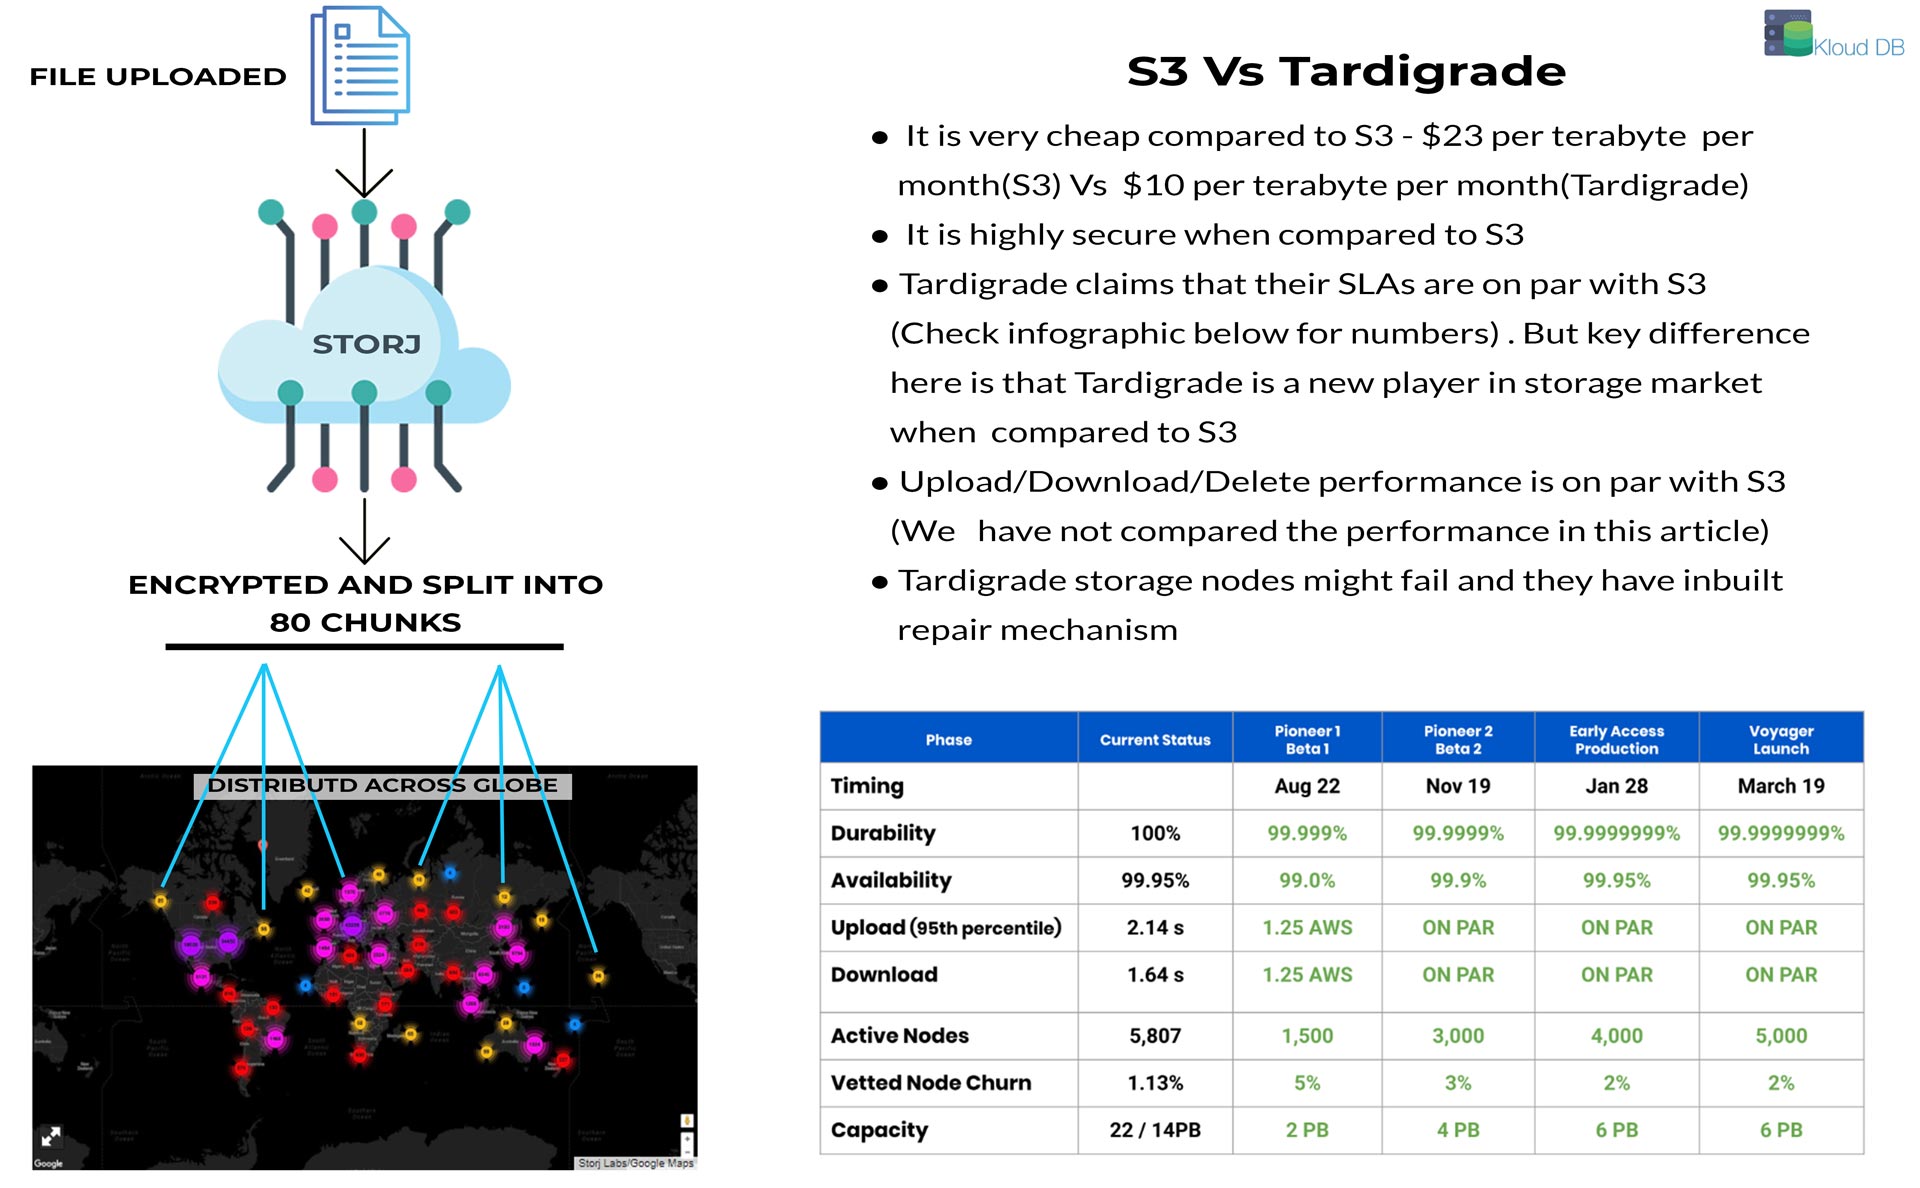
It is the world’s first S3-compatible decentralized cloud storage solution (Powered by Storj Labs) . Each file uploaded will be encrypted and split into 80 chunks and distributed across the satellite nodes. It costs very less when compared to AWS and GCP storage – Half of S3 cost. Also it is very secure and distributed (E.g : There was S3 outage few months back which impacted many services around the world. But since tardigrade is distributed these type of scenarios can be avoided)
Configure Tardigrade CLI
Create tardigrade account :
To begin using tardigrade(storj labs) storage , please create an account using below URL. You will get 50GB of free storage . Also create API key once you login to tardigrade account . This will be used to encrypt backups . NOTE: Save this key carefully somewhere as it is needed to download your files
https://documentation.tardigrade.io/getting-started/uploading-your-first-object/prerequisites
Setup uplink binary on your linux machine :
curl -L https://github.com/storj/storj/releases/latest/download/uplink_linux_amd64.zip -o uplink_linux_amd64.zip
unzip -o uplink_linux_amd64.zip
chmod 755 uplink
sudo mv uplink /usr/local/bin/uplink
Uplink command options :
Below are some of the options you can use with uplink command :
| Command | Meaning | ||||
|---|---|---|---|---|---|
| Cp | Copies a file to storj bucket . Similar to aws cp for s3 | ||||
| Mb | Create new bucket | ||||
| Ls | List objects in a bucket | ||||
| Rb | Remove an empty bucket | ||||
| Rm | Delete an object | ||||
| Setup | to do the initial setup | ||||
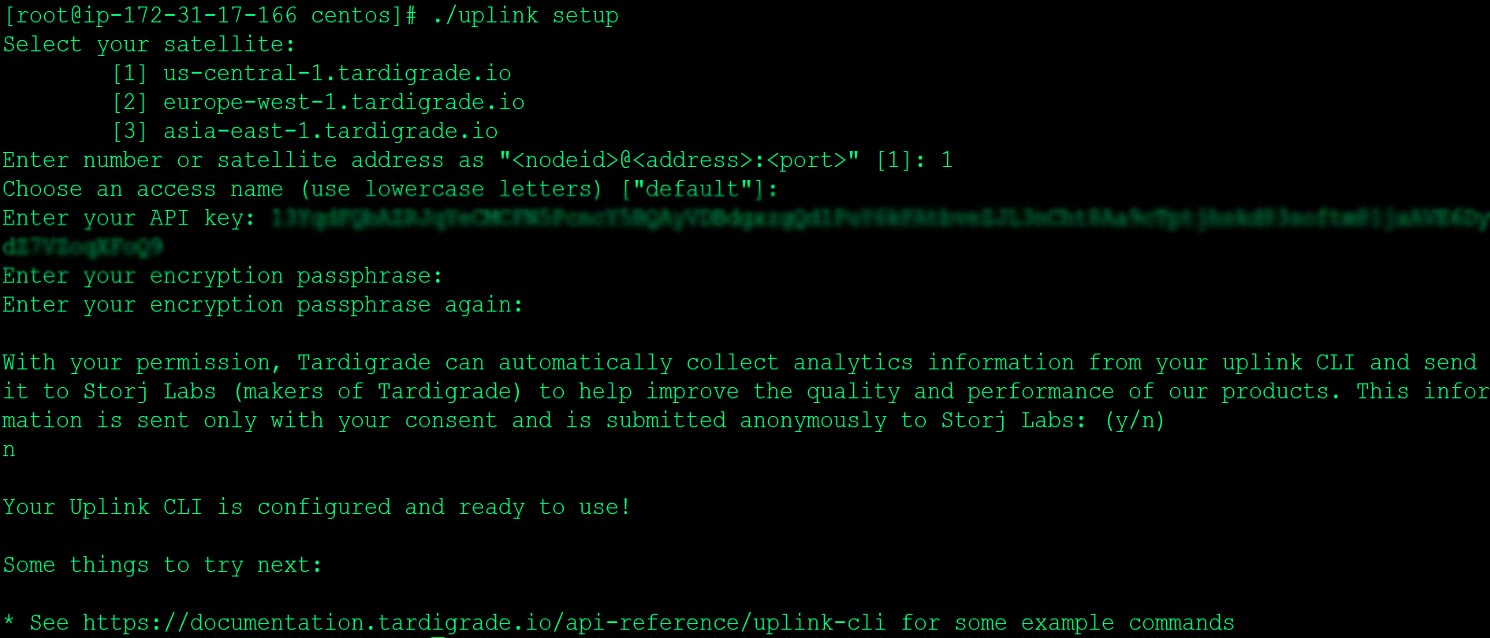
Uplink setup :
Please setup your uplink account locally (similar to aws configure) . You need use api key that you generated when you created tardigrade account
[root@ip-172-31-28-116 centos]# ./uplink setup
Backup and restore MySQL databases using blockchain storage
Create a new bucket to store your backups (Percona xtrabackup)
./uplink mb sj://mysqlbackups
You should see “Bucket mysqlbackups created” message
Take backup of your mysql database(s) – Using percona xtrabackup
innobackupex –user=root –password=’XXXX’ –stream=tar ./ | gzip – > backup.tar.gz
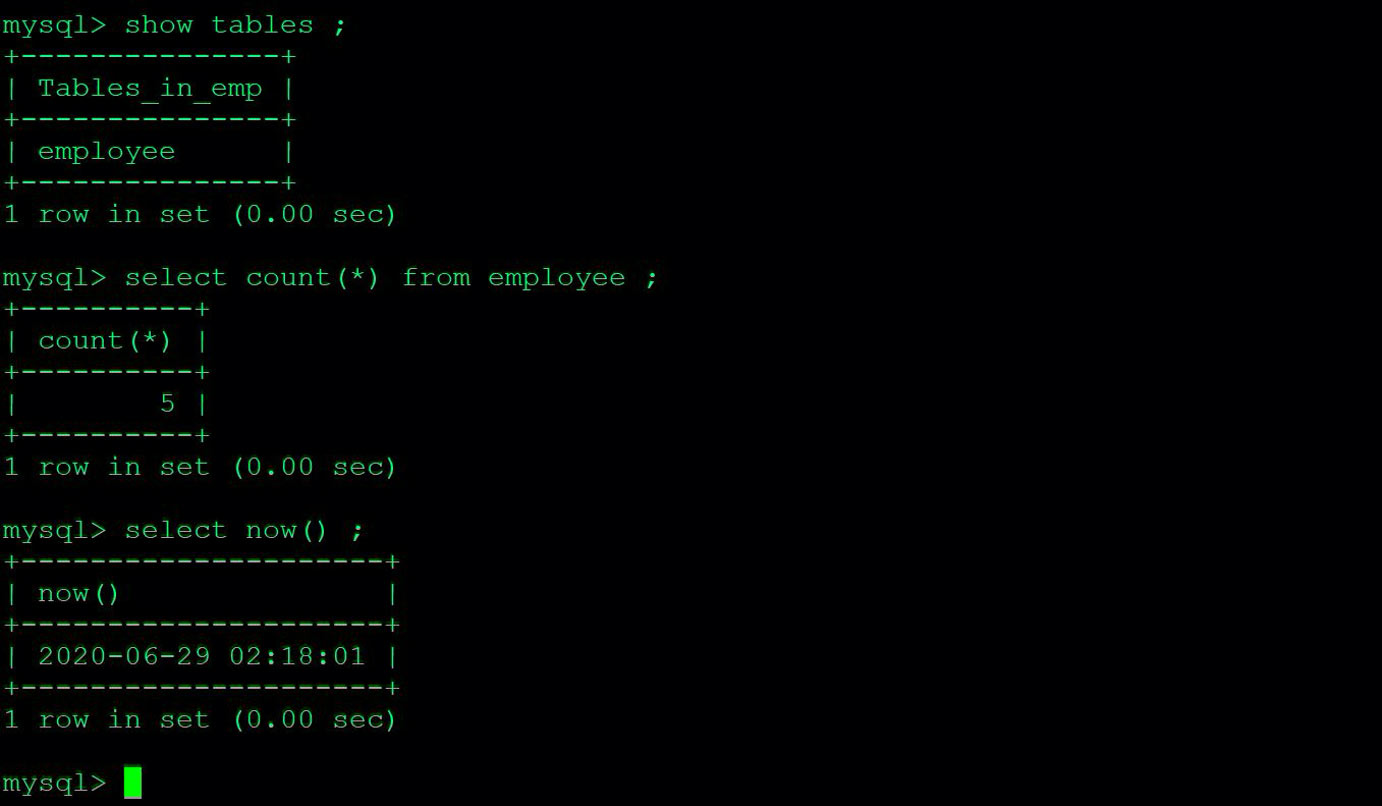
Validate table content - Before restore snapshot
Push the backup file to storj bucket that you created
./uplink cp /backups/backup.tar.gz sj://mysqlbackups
410.45 KiB / 410.45 KiB [--------------------------------------------------------------] 100.00% 389.52 KiB p/s
Created sj://mysqlbackups/backup.tar.gz

[root@ip-172-31-17-166 centos]# ./uplink ls sj://mysqlbackups
OBJ 2020-06-29 02:30:14       420298 backup.tar.gz
[root@ip-172-31-17-166 centos]#
After sometime retrieve backup files from storj bucket
[root@ip-172-31-17-166 centos]# ./uplink cp sj://mysqlbackups/backup.tar.gz /tmp
410.45 KiB / 410.45 KiB [----------------------------------------------------------------] 100.00% 1.11 MiB p/s
Downloaded sj://mysqlbackups/backup.tar.gz to /tmp/backup.tar.gz
[root@ip-172-31-17-166 centos]#

cp /tmp/backup.tar.gz /backups/restoretest
Restore the backup from retrieved file and verify if all the tables are intact
innobackupex --user=root --password='XXXX' /backups/restoretest --apply-log

 innobackupex --user=root --password='XXXX' /backups/restoretest --copy-back
Verify if all the tables are intact

Backup and restore PostgreSQL databases using blockchain storage
Create a new bucket to store your backups (Pg_basebackup)
[root@ip-172-31-27-129 centos]# ./uplink mb sj://pgresbackups
Bucket pgresbackups created
Take backup of your database(s) – Using pg_basebackup
pg_basebackup -D backup1 -U postgres -Ft -z -P
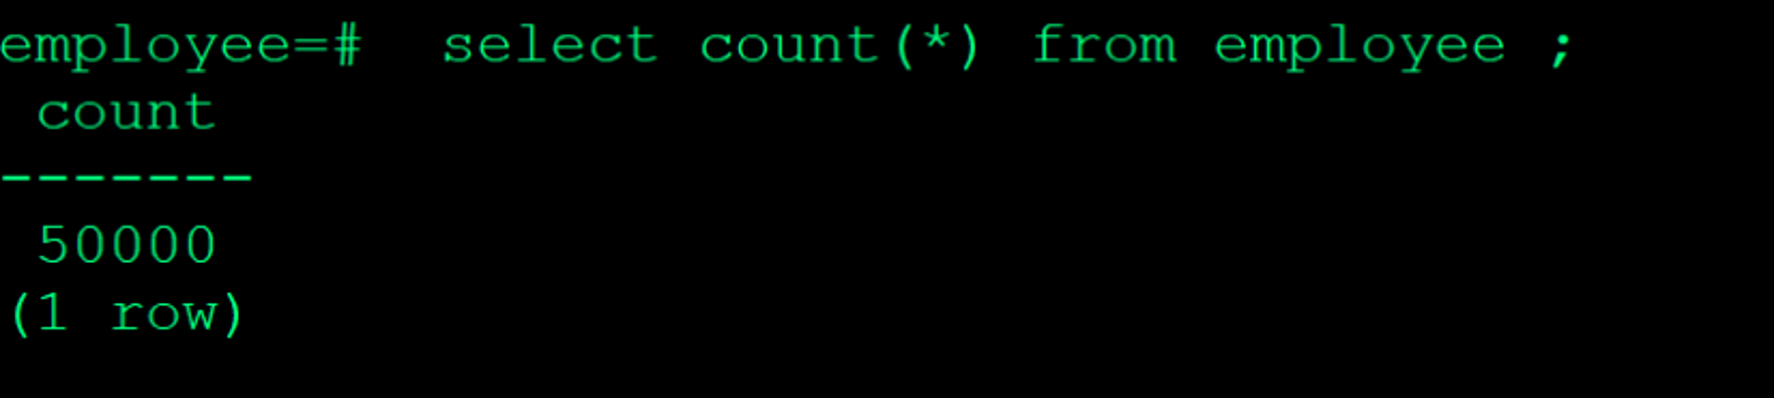
Validate table content - Before restore snapshot


Push the backup file to storj bucket that you created
[root@ip-172-31-27-129 centos]# ./uplink cp /var/lib/pgsql/backup1/base.tar.gz sj://pgresbackups
4.29 MiB / 4.29 MiB [--------------------------------------------------------------------] 100.00% 3.67 MiB p/s
Created sj://pgresbackups/base.tar.gz
[root@ip-172-31-27-129 centos]# ./uplink cp /var/lib/pgsql/backup1/pg_wal.tar.gz sj://pgresbackups
16.67 KiB / 16.67 KiB [-----------------------------------------------------------------] 100.00% 26.93 KiB p/s
Created sj://pgresbackups/pg_wal.tar.gz
[root@ip-172-31-27-129 centos]#
After sometime retrieve backup files from storj bucket
[root@ip-172-31-27-129 centos]# ./uplink ls sj://pgresbackups
OBJ 2020-07-05 00:44:37        17074 pg_wal.tar.gz
OBJ 2020-07-05 00:44:24      4502097 base.tar.gz

[root@ip-172-31-27-129 centos]# ./uplink cp  sj://pgresbackups/pg_wal.tar.gz /tmp
16.67 KiB / 16.67 KiB [-----------------------------------------------------------------] 100.00% 72.73 KiB p/s
Downloaded sj://pgresbackups/pg_wal.tar.gz to /tmp/pg_wal.tar.gz
[root@ip-172-31-27-129 centos]# ./uplink cp  sj://pgresbackups/base.tar.gz /tmp
4.29 MiB / 4.29 MiB [--------------------------------------------------------------------] 100.00% 4.72 MiB p/s
Downloaded sj://pgresbackups/base.tar.gz to /tmp/base.tar.gz
[root@ip-172-31-27-129 centos]#
Restore the backup from retrieved file and verify if all the tables are intact
Join our Beta Program
Join the beta testing program :
Below are some concerns that people have with this kind of storage :
How reliable is this storage ?
Our files are stored on nodes across the globe ? How secure are these backups ?
What happens if some of nodes fail ?
To address these concerns we are running several tests from our side to build a reliable backup tool using Tardigrade : Auto-restore testing , Check repair status of failed nodes etc..
Like to use Tardigrade for your backups ? Join our beta program by filling below form.