
Oracle cloud gives you two always-free vms which can be used as sandbox servers. So next time when you want to test a new database feature , research on a problem, remember this and use them to save your costs . Unlike AWS,Azure these are free forever (There is no trial period/ free usage limits on these)-
NOTE : They stay free forever 🙂 No more monthly bills for your test servers
How do we create these two servers then ?
If you want to do this manually you may need to spend a few hours/days sometimes . We have added terraform code in our repo which can be used to quickly deploy the VMs :
All you have to do is 1) Fill in the required inputs as discussed below 2) Run “Terraform plan” 3) Run “Terraform apply”
Refer to our repo for further instructions and code : https://github.com/klouddb/oci_alwaysfreedbservers
What are the specs for the instances ??
Storage – 2 Block Volumes, 100 GB total. 10 GB Object Storage. 10 GB Archive Storage.
Compute – 2 virtual machines with 1/8 OCPU and 1 GB memory each.
What steps are needed before we can run Terraform code ??
export  TF_VAR_tenancy_ocid=ocid1.tenancy.oc1..xxxxxxxxxfbv5e3wcxxxx
export TF_VAR_user_ocid=ocid1.user.oc1..xxxxxjtwlfff
export TF_VAR_fingerprint=6f:31:4d:24:8a:88989898
export TF_VAR_private_key_path=/tmp/oci_api_key.pem
export TF_VAR_region=us-sanjose-1
export TF_VAR_compartment_ocid=ocid1.tenancy.oc1..vuuhiuhouho
But people find it hard to extract these details from their OCI account . We have included screenshots below to make the process easy
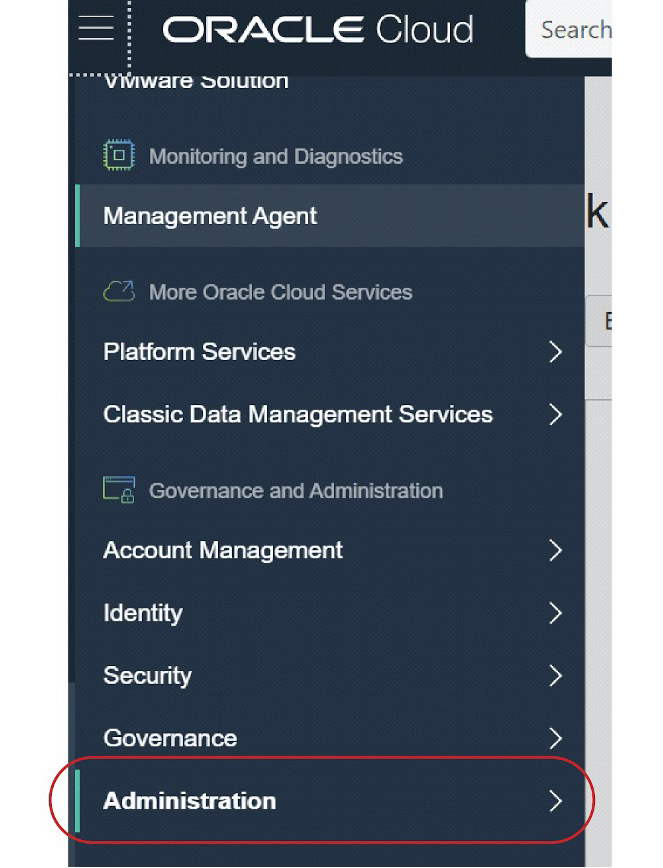
How to get tenancy_id ?
Click Adminstration tab followed by tenancy details (Hit on Adminstration tab → Tenancy details) .
See below image (Adminstration tab is circled in red)
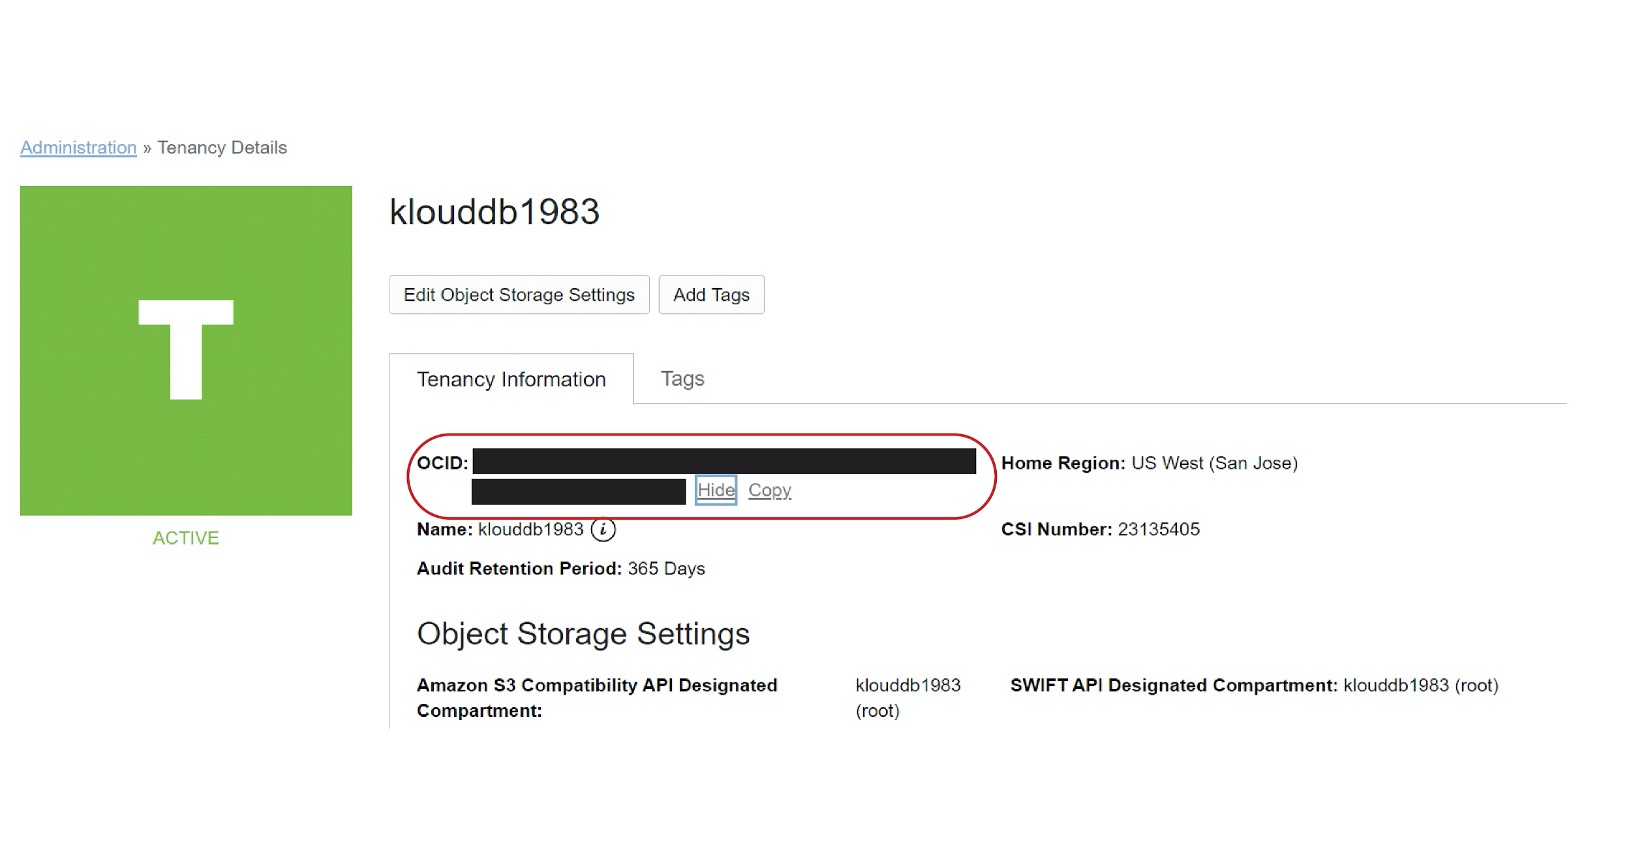
Once you click Tenancy details you should be able to see something like below . You need to get the value for OCID that is circled in red and place it in your envvars file
How to get user_ocid ?
Click Identity tab followed by Users (Hit on Identity tab →Users → User details)
Please see the highlighted item below (circled in color) . This is the place to get your user_ocid

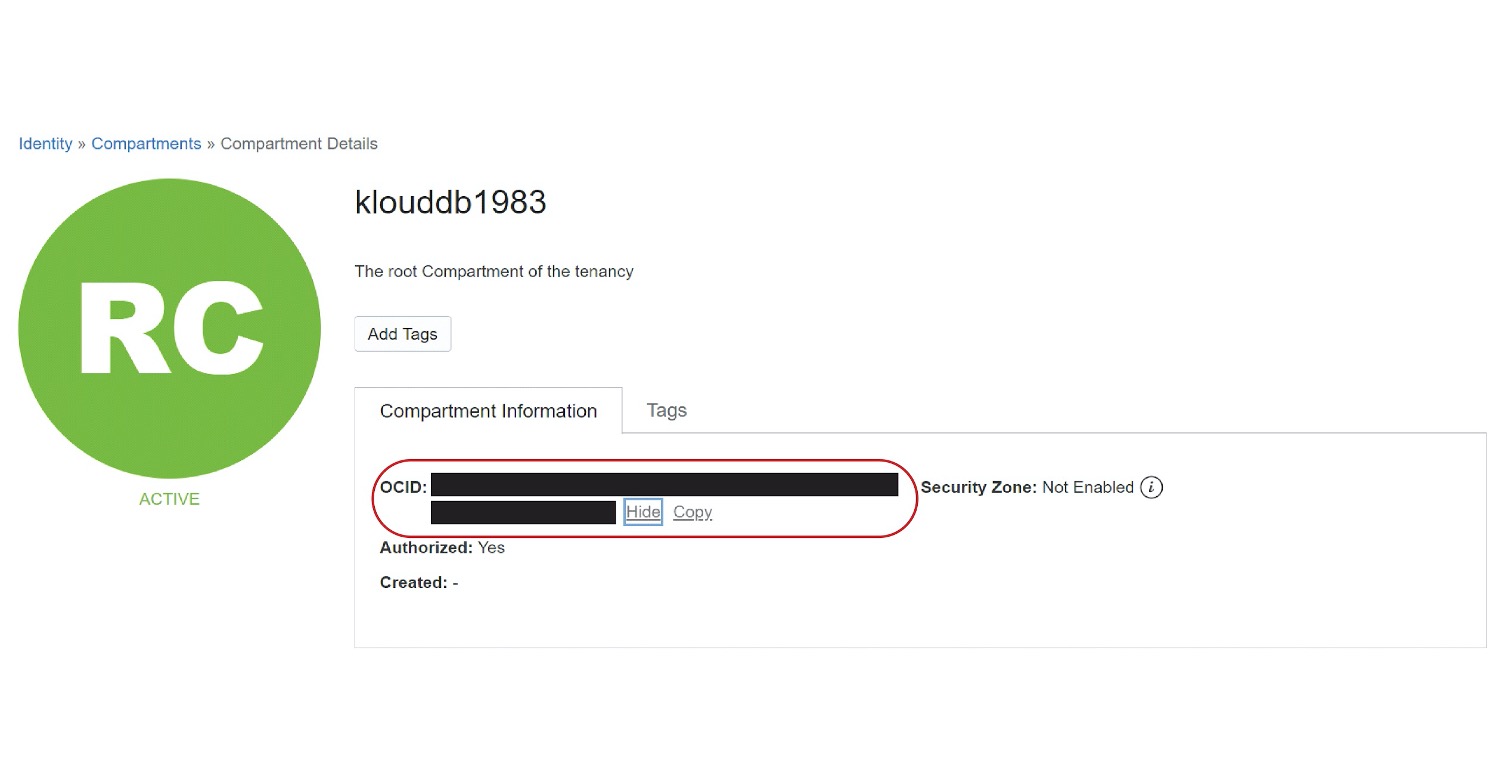
How to get compartment_ocid ?
Click Identity tab followed by Compartments followed by Compartment Details(identity → Compartments → Compartment Details :
Please see the highlighted item below (circled in color) . This is the place to get your compartment_ocid
What about fingerprint and private_key_path . Where to get those ?
user@computer$ openssl genrsa -out oci_api_key.pem 2048NOTE : Save this key (similar to how you save your AWS key) . You need to move it to your linux server where you are running terraform from and give the this path for private_key_path variable in envvars file Change permissions :
user@computer$ chmod 600 oci_api_key.pemYou can generate the public half of the key pair using below command :
user@computer$ openssl rsa -pubout -in oci_api_key.pem -out oci_api_key_public.pemThe public key needs to be added to your user account in the OCI console.Open the account page for your user and select the “Add Public Key” button. Copy and paste the contents of the oci_api_key_public.pem file in the box of the “Add Public Key” dialog Notice that after the public key is added the fingerprint is listed in the “API Keys” list. Copy the fingerprint for later use. Sample fingerprint would look like below (Under API keys)

Are we ready to execute our terraform code now ?
Yes . Once you populate above envars in your envvars file run below steps
Source your environment file to load above values that you defined in envvars file :

After running above , go to your terraform code folder and run “terraform plan” . NOTE : You need to download and setup terraform on your machine before you can run this
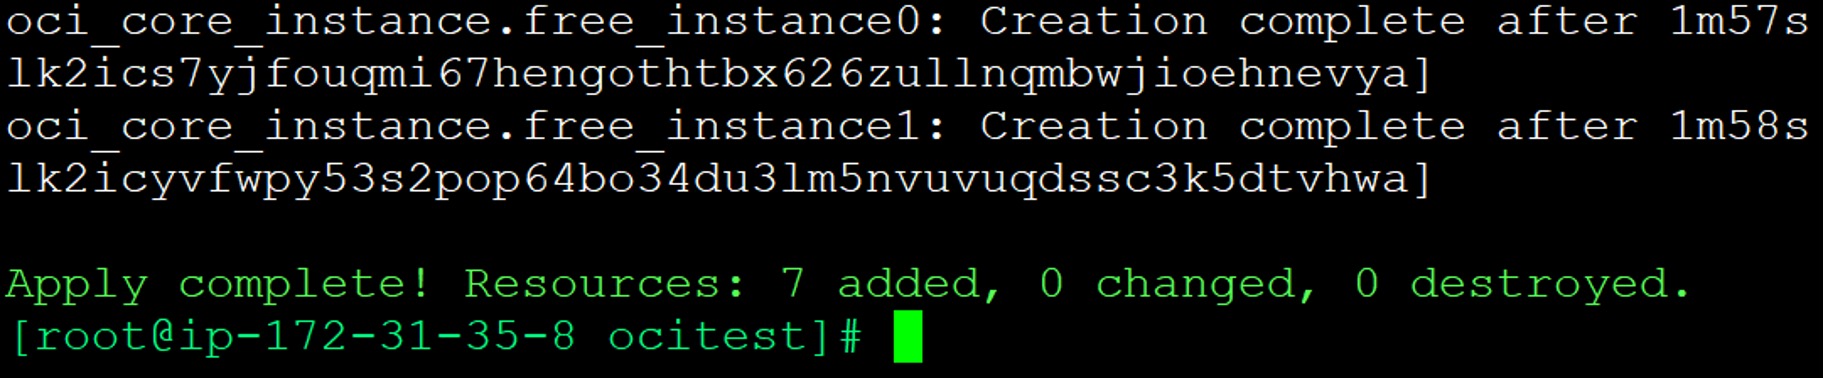
Once your plan is successful you can go ahead and run “terraform apply” . You should see something like below if the apply is successful
How do we get the public ip of these new hosts ?
You can get the public ips for the new vms using the below command on terraform.tfstate file . This file is generated once you run above terraform commands

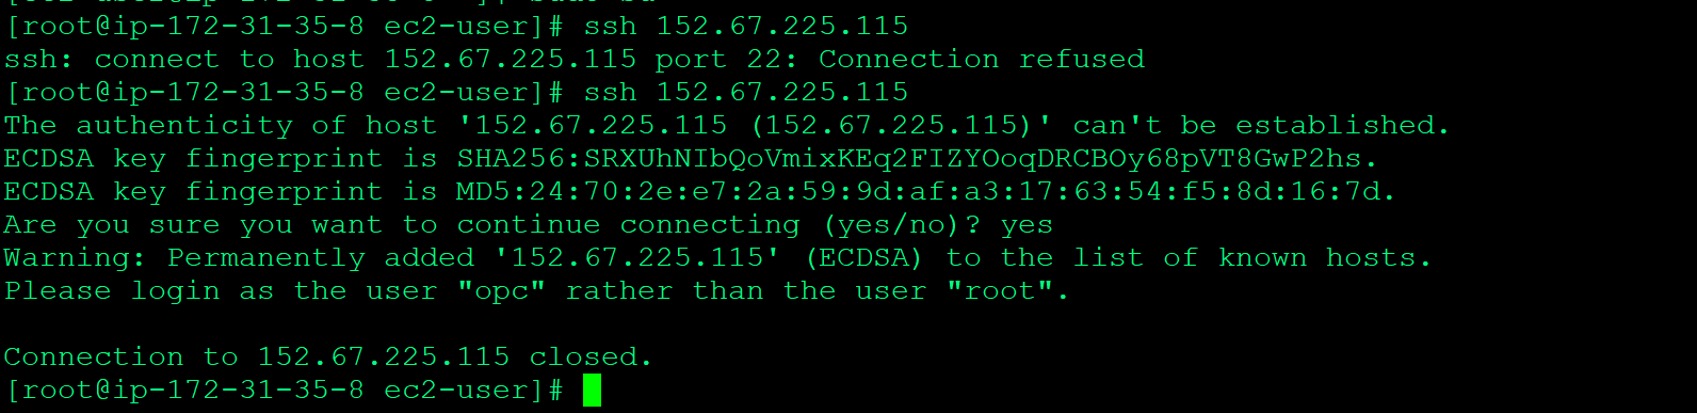
How to access these hosts now ?
You just need to ssh to these hosts with the key . NOTE : You need to give it a few minutes after deployment . You may see “connection refused” like below for some time . Also use “opc” user :
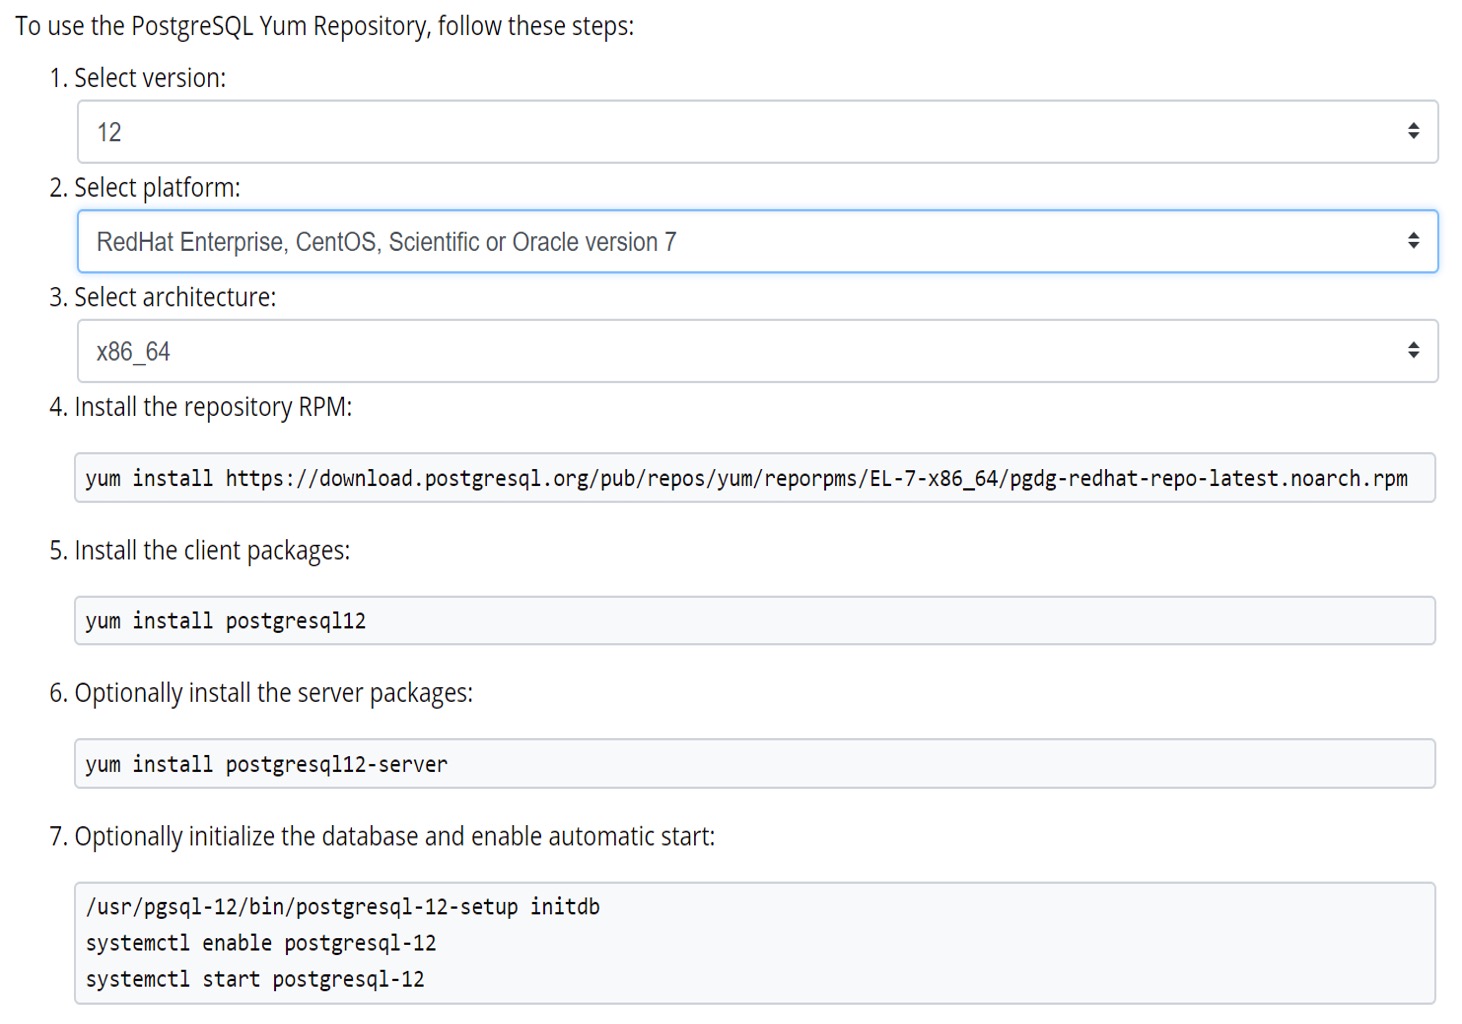
How to install PostgreSQL 12 on these vms ?
Go to below URL and follow steps outlined in the diagram below
How to install MySQL 8 on these vms ?
yum install https://repo.percona.com/yum/percona-release-latest.noarch.rpm

percona-release setup ps80

yum install percona-server-server

yum install percona-mysql-shell.x86_64