
Table of Contents
In this article, we will delve into an intriguing aspect of identifying the optimal and cost-effective solution for hosting a MongoDB deployment.
MongoDB clusters can be set up in a myriad of ways, whether in a self-managed environment—which is a common practice—or through enterprise Database as a Service (DBaaS) offerings like MongoDB Atlas or ObjectRocket. For a fair analysis, we will narrow our focus to MongoDB Atlas, juxtaposing a commercial product against a community-driven open-source alternative.
Our comparison will pivot on the following key aspects:
- Cost Analysis: Evaluating the financial implications of running MongoDB on a DBaaS solution like Atlas versus self-managed cloud Virtual Machines (VMs).
- Migration Tactics: Strategies to transition MongoDB clusters from Atlas to self-managed VMs.
- Tooling and Backup Solutions: Comparing the monitoring tools and backup solutions provided by Atlas with those available in community-driven open-source platforms.
Through this examination, we aim to furnish a well-rounded perspective that could assist in making informed decisions regarding MongoDB deployment solutions.
Let’s explore a scenario where we operate a MongoDB sharded cluster, and compare the costs associated with managing it on MongoDB Atlas versus self-managed cloud Virtual Machines (VMs). We will delve into the available options in the following section.
Cost calculation
This calculation is made for an unsharded 3 node replica set . Given below are backup size , workload type , Retention , Number of requests etc..
Dataset Size: 1TB (on disk) , OR 3TB (logical)
Number of requests per sec: 10K
Type of workload: 50% reads and 50% writes
Storage Type : SSD
Backup size : 1.5TB
Frequency of backups : Every 24 hours (full)
Retention: 30 days

BACKUP and STORAGE COSTS
Please be aware that the provided figures are estimates and might deviate.
In the following section, we’ll focus on the post-migration backup configuration, which includes:
- Scheduled full backups every 24 hours, supplemented by incremental backups every 10 minutes.
- The designated storage location for these backups is an S3 bucket.
For a clearer understanding of the backup data volume:
- Our sharded cluster has about 1TB of uncompressed data, with an hourly oplog processing rate of 10GB.
- The full dump would equate to 3TB logically or 1TB physically.
- The oplog would account for 250GB.
- This sums up to 3.25TB logically or 1.2TB physically.
The expected monthly cost for this configuration is approximately USD 3,000.It’s worth noting that there won’t be any network transfer expenses if the S3 region aligns with the EC2 instance region. Minimal requests to the S3 bucket also mean we can disregard its charges.
Given this, the total estimated costs for Network and Storage (backups) in AWS post-migration would be around USD 4,300 monthly, while the cost to operate the EC2 instances is projected at USD 1,700.
This brings the total monthly expense for maintaining three EC2 instances to approximately USD 6,000.
Regarding Atlas pricing on AWS, according to the documentation, the M60 Cluster Tier is required, costing about USD 3,000 per month for each instance, amounting to USD 9,000 in total.
For the backups, given the same size, frequency, and retention, the expected cost is around USD 4,500.
Thus, the cumulative expense is projected at approximately USD 13,500.
However, please bear in mind that these figures might not be entirely precise due to various influencing factors. Our calculations are based on general usage assumptions.
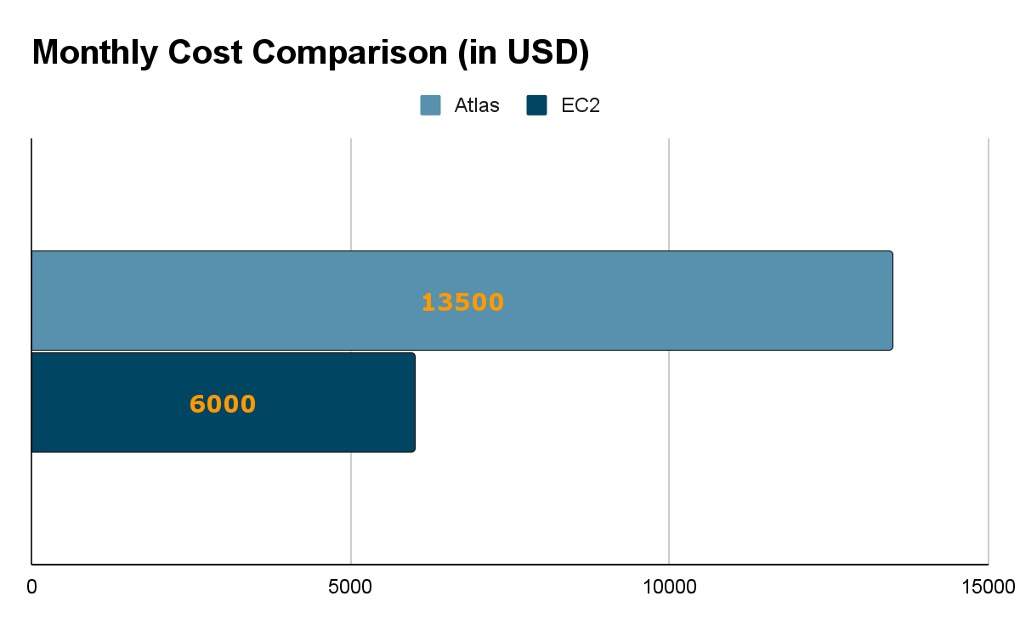
After migrating, the anticipated savings amount to:
An estimated monthly saving of USD 7,500, representing a savings rate of approximately 55%.
Note – There are also costs associated with Data transfer in some cases .. You need to add that to calculation
2. Migration Plan
As initially pointed out, the choices are limited when it comes to open-source solutions driven by the community . Notable among these are Percona Server for MongoDB and FerretDB, which is compatible with MongoDB.
In this blog, as we delve into the case study of a self-managed MongoDB deployment, our primary focus will be on Percona Server for MongoDB. However, stay tuned for a detailed exploration of FerretDB in an upcoming blog post.
Below is the high level plan for actual migration activity which includes,
- Provisioning of target replica set cluster
- Deploying MongoDB Cluster with Percona Server for MongoDB (Free and Open Source) on EC2 with similar configuration as source Atlas clusters
- Migration of database to self-managed EC2 hosted MongoDB Clusters in realtime using OpenSource tool HummingBird (aka MongoPush) and MongoShake
- Deploying OpenSource Monitoring and Alerting solution – Percona Monitoring and Management
- Configuration of automated backups with tools like Percona Backup for MongoDB or in-built features such as hotbackups
- Enabling auditing and encryption
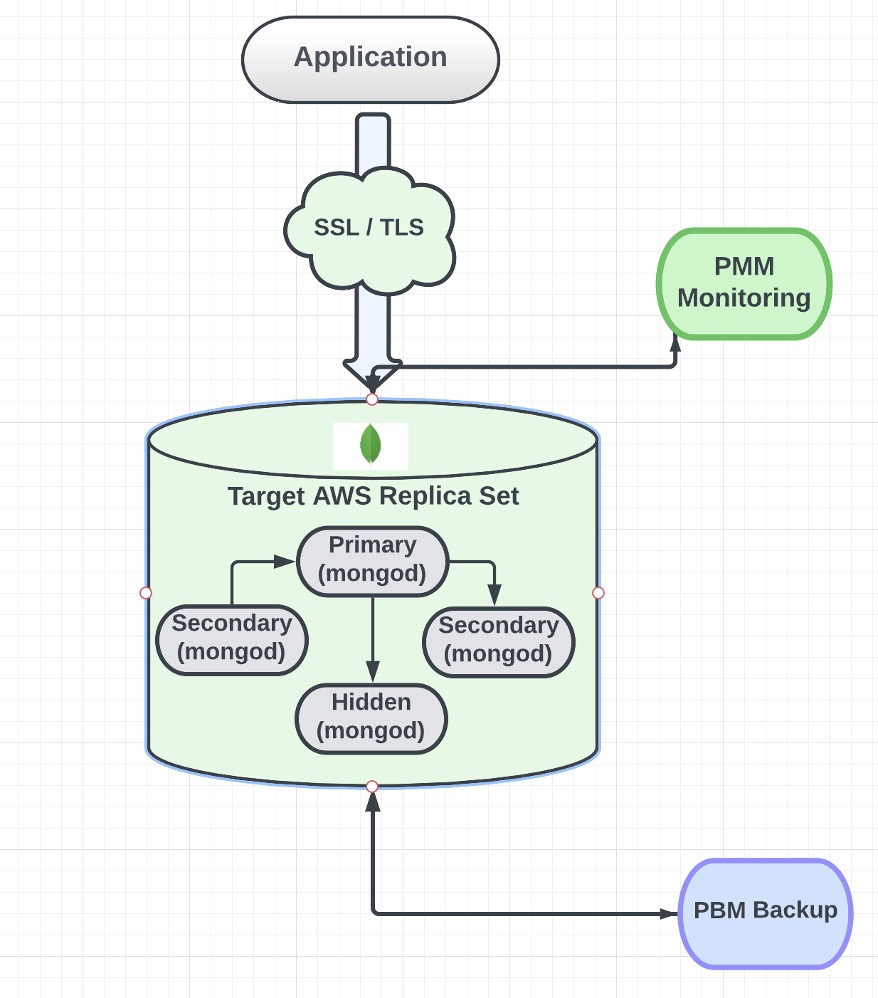
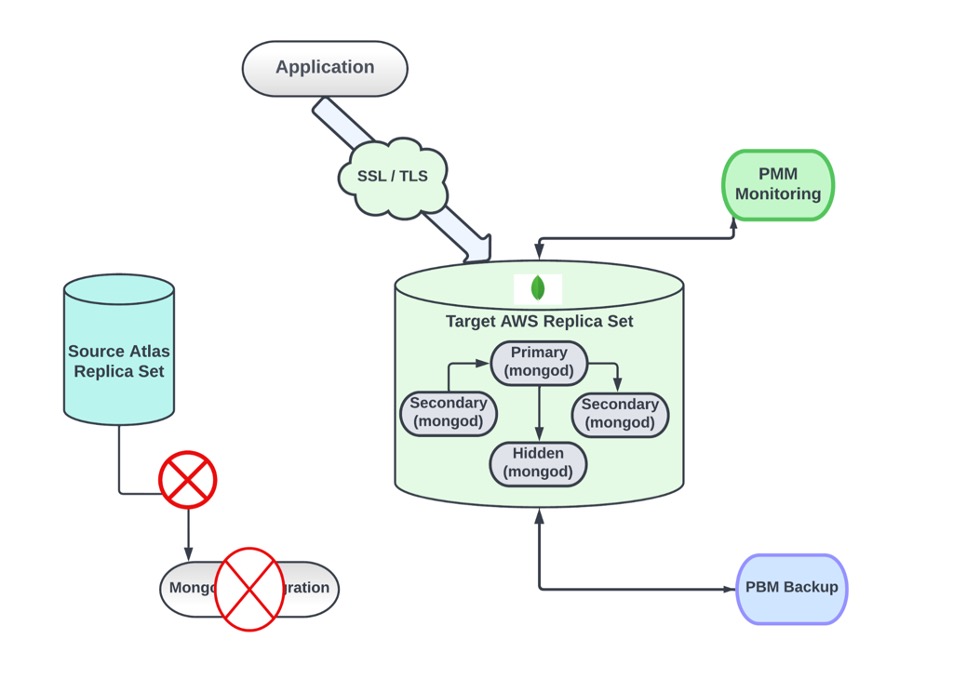
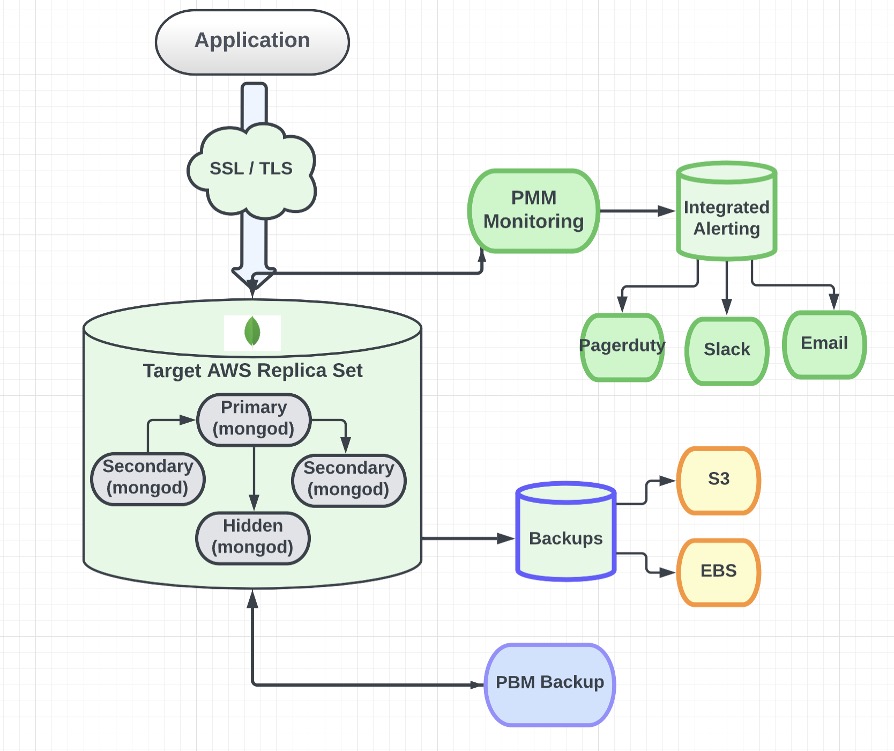
Below diagram depicts the target architecture (After migrating from MongoDB Atlas)
A. Deploying MongoDB replica sets
Once the EC2 instances are set up in the specified regions, we can proceed with the steps to deploy a replica set using Percona Server for MongoDB. Detailed steps are given in percona docs https://docs.percona.com/percona-server-for-mongodb/5.0/install/index.html
					$ sudo yum install https://repo.percona.com/yum/percona-release-latest.noarch.rpm -y
$ sudo percona-release enable psmdb-60
$ sudo yum install percona-server-mongodb -y
Once installation finishes, follow steps here and start the replica set( replica set members are NodeA, NodeB and NodeC in this example scenario)
Let’s assume the URI or connection string for connecting to the replica set is as follows:
mongodb://<user>:<password>@NodeA:27017,NodeB:27018,NodeC:27019/admin?replicaSet=myReplica&authSource=admin
Now, set up a user and grant them the ‘readWriteAnyDatabase’ role so they can be involved in the migration
B. Performing migration of data
To start migration using MongoPush, HummingBird, or MongoShake, there are several prerequisites to fulfill. Given that the MongoPush repository is now private, follow the steps below to retrieve the binary and begin its use
					$ docker pull simagix/mongopush:1.0
$ docker create <imageID> /bin/sh
$ docker cp <containerID>:/mongopush /pathToCopy
Ensure that a dedicated user is created in the Atlas source cluster, endowed with the readAnyDatabase and clusterMonitor roles, for use during migration.
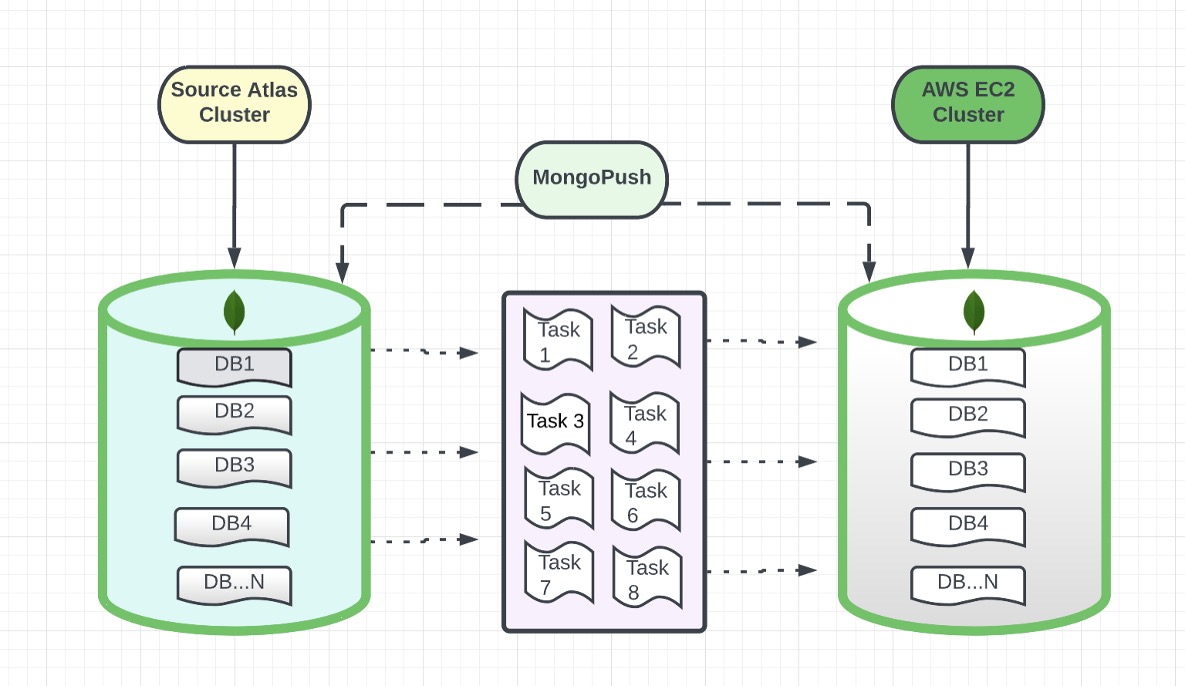
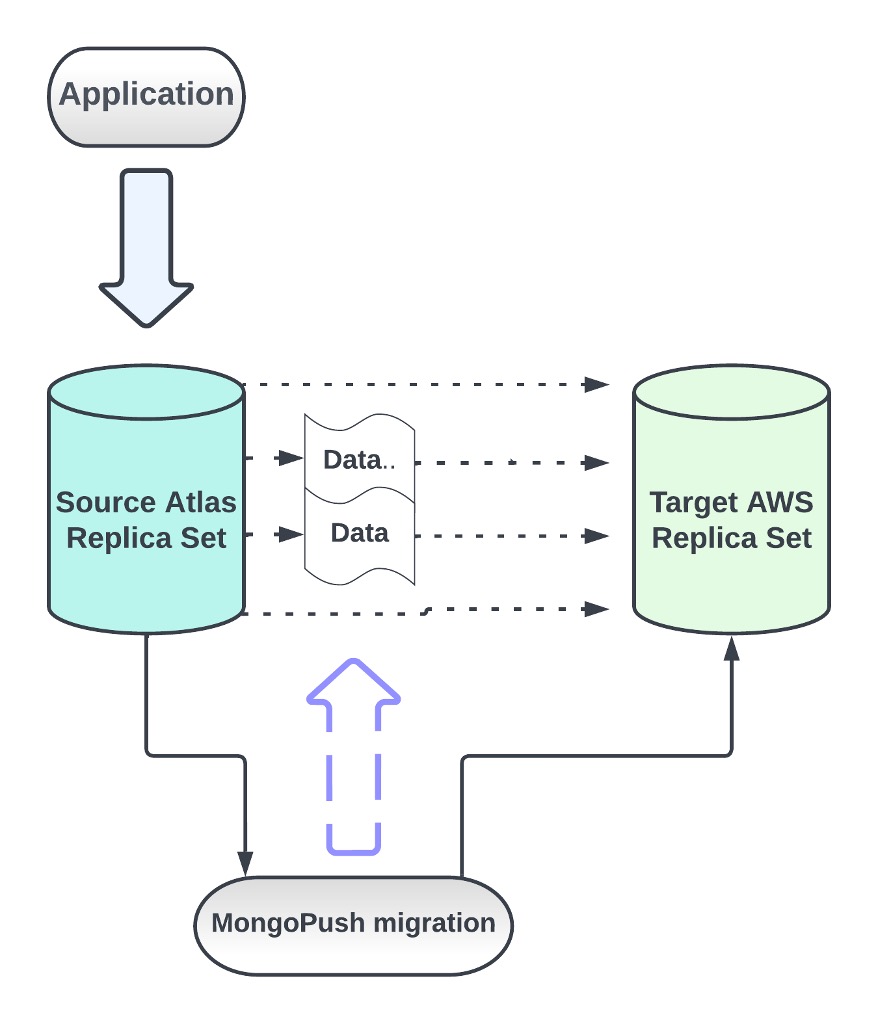
To sum it up, MongoPush operates by replicating data from the source cluster to the target cluster in batches, mirroring the actions of a secondary node in a replica set. The following image illustrates the overall process, showcasing how data is replicated in multiple parallel tasks or batches
Start Migration using below steps:
$ mongopush -push all -drop -source "<sourceURL>" -target "<targetURL>"
$ mongopush -license Apache-2.0 -exec /pathToJson/mongopush-all.json
$ mongopush -resume /pathToJson/mongopush-all.json // Resume mirroring
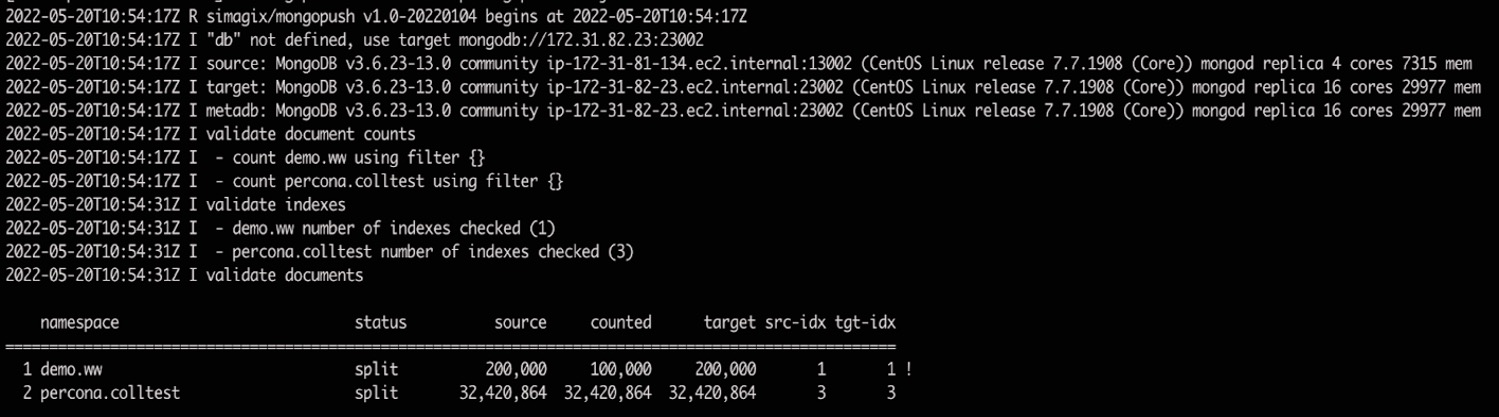
$ mongopush -validate /pathToJson/mongopush-all.json // Validate once mirroring finished
After the migration is complete and both the source and target clusters are confirmed to be in sync, the following steps should be undertaken:
- Use the aforementioned command to ensure both clusters align perfectly.
- Modify the connection string of the new cluster within the application or at the driver’s end.
- Execute post-migration checks for validation.
Note: There won’t be any significant downtime, just a brief moment when the driver redirects the application to the new cluster using its connection string. The total duration for migration completion varies based on factors such as network conditions, write activity on the source cluster, and the volume of data/indexes, among others
C. Deploying Open Source Monitoring and Alerting
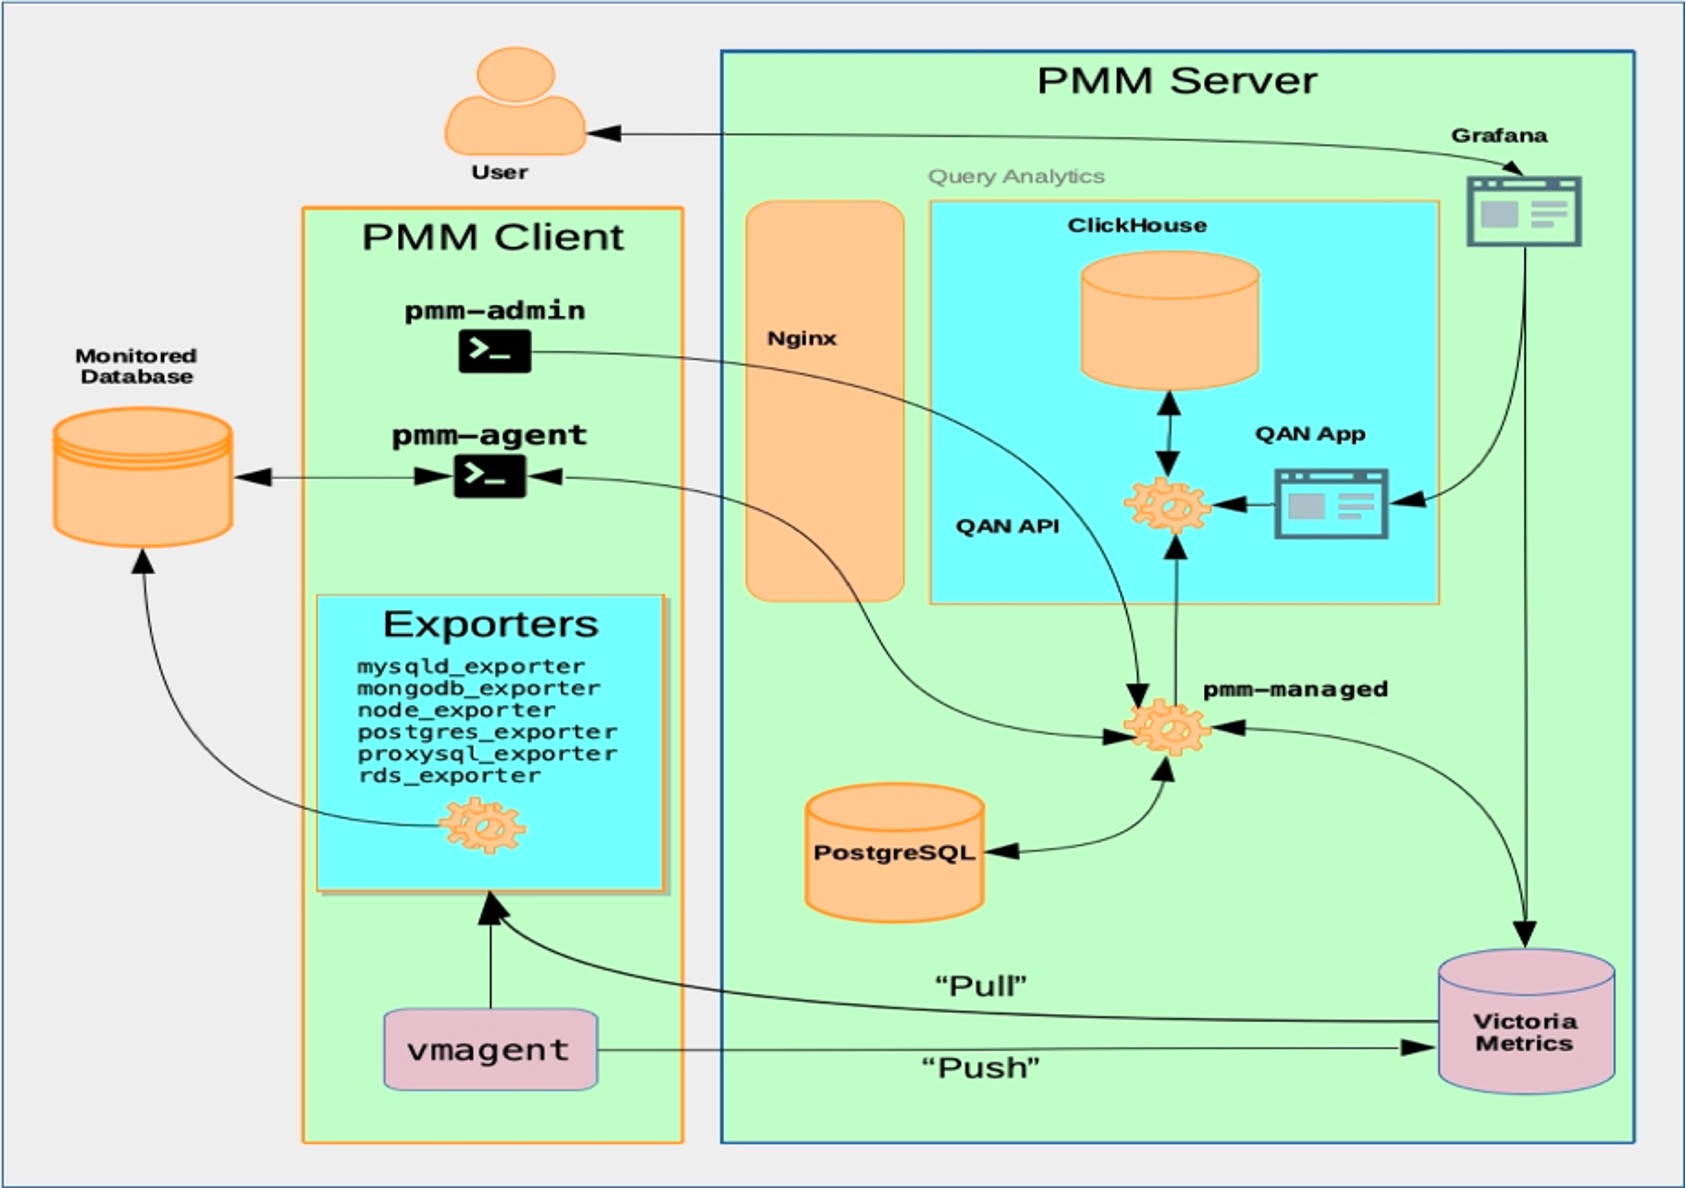
While numerous free solutions exist, we prefer Percona Monitoring and Management because it closely matches Atlas in offering comprehensive metrics and an integrated alerting system. You can learn more by going here
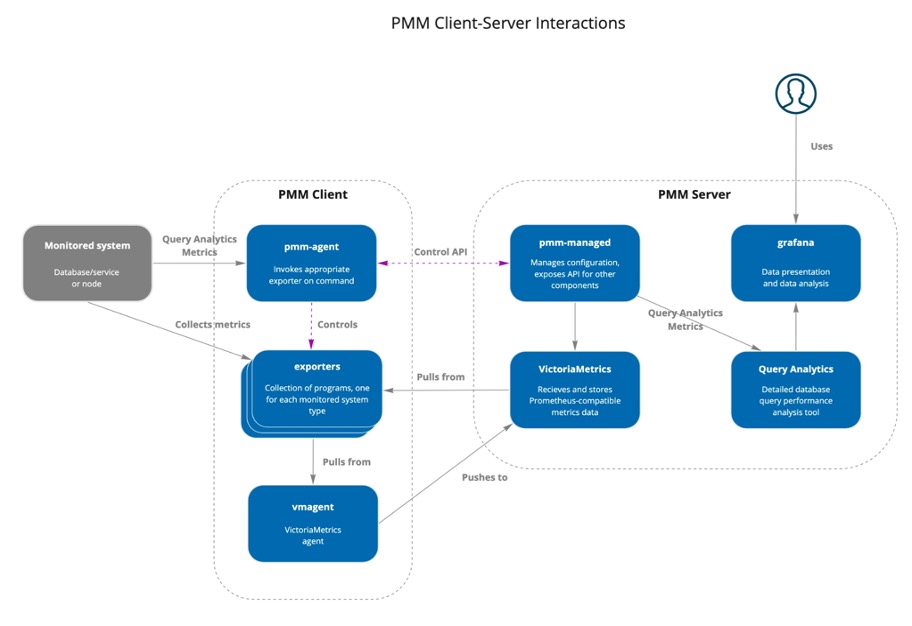
The PMM platform is based on a client-server model that enables scalability. It includes the following modules:
- PMM Client installed on every database host that you want to monitor. It collects server metrics, general system metrics, and Query Analytics data for a complete performance overview.
- PMM Server is the central part of PMM that aggregates collected data and presents it in the form of tables, dashboards, and graphs in a web interface.
| Atlas | |||
|---|---|---|---|
| Database Metrics | YES | ||
| Server Metrics | YES | ||
| Cluster Metrics | YES | ||
| Replication Metrics | YES | ||
| OS Metrics | YES | ||
| Alerting | YES | ||
| Custom Metrics | NO | ||
| Percona Monitoring and Management | |||
|---|---|---|---|
| Database Metrics | YES | ||
| Server Metrics | YES | ||
| Cluster Metrics | YES | ||
| Replication Metrics | YES | ||
| OS Metrics | YES | ||
| Alerting | YES | ||
| Custom Metrics | YES | ||
Alerting:
We can utilize PMM for alerting as it offers extensive customizable alerting rules and templates. There’s no need for a separate installation for this purpose. Detailed documentation can be found here.
D. Deploying fully managed Percona Backup for MongoDB
Complete documentation is available here including installation guide as well.
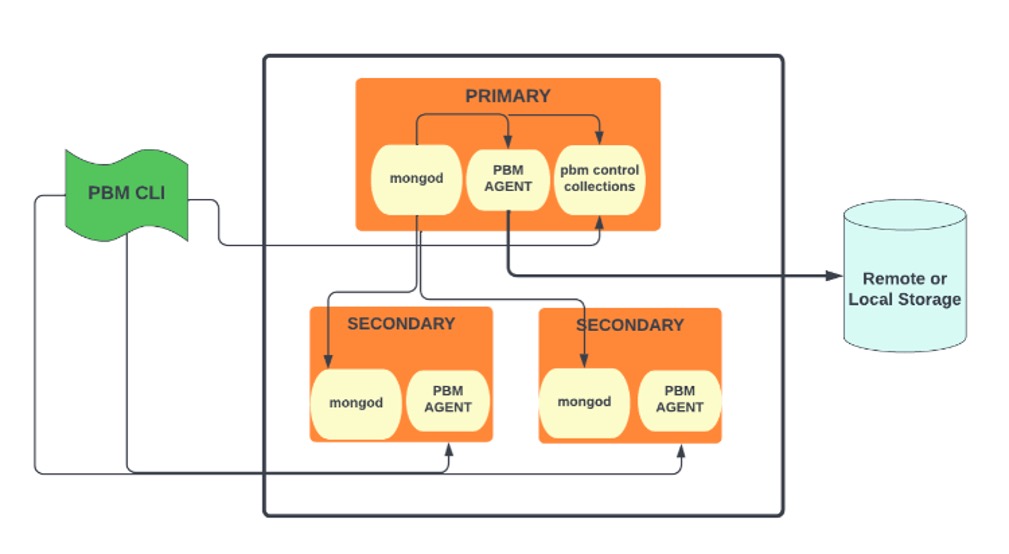
Features :
- Fully managed backup and restore solution
- Supports both logical and physical backups and restores
- Supports incremental backups
- Supports local, NFS or cloud storage locations
- Supports multiple compression methods
- Consistent Sharded Environment backup and restores starting v1.7+
E. Configuring security for MongoDB Clusters
There are various methods to enhance the security of a database stack, including transport encryption (utilizing SSL/TLS), LDAP, or encryption at rest by employing an external database to encrypt underlying data files. As these features are exclusive to the paid MongoDB Enterprise versions, we’ll be using Percona Server for MongoDB for these functionalities as well.
Conclusion
In the next part we will blog about FerretDB and how you can save costs by migrating your Atlas clusters to FerretDB
Please check “Kmon” , “KloudDB Shield” and “KloudDB School” .Also check our performance articles –Pg_fincore and pg_buffercache to troubleshoot performance issues , Pgbouncer multiple instances(How we increased our TPS using multiple instances) , Postgres and temporary files , Pgpool and performance tuning, How we improved Lambda performance by 130x etc..